How to Turn a Spotify Screenshot Into a Proper Poster
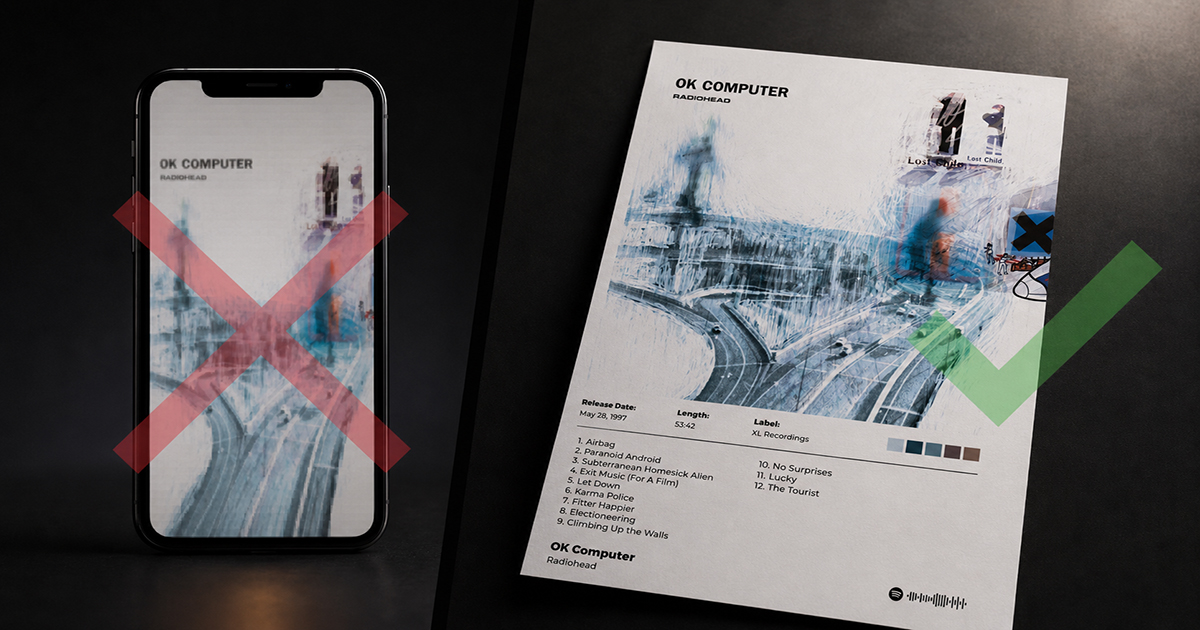
You've seen the Spotify interface enough to know exactly which album art you love. So it makes sense to screenshot it and try to turn it into a poster. The problem: Spotify screenshots make terrible posters.
The resolution is wrong. The dimensions are wrong. Spotify's UI elements are usually in the frame. And even if you crop it perfectly, you're starting from a compressed JPEG at screen resolution — far below what any printer needs for a clean result.
This guide explains why Spotify screenshots fail as posters, and shows the right way to get from "I want a poster of this album" to a print-ready file that actually looks good on a wall.
Why Spotify Screenshots Don't Work as Posters
The resolution problem
Your phone screen is typically 1080–1440 pixels wide. A screenshot captures that resolution — it's fine for viewing on a screen, but completely insufficient for print.
A print-quality poster at A3 (11.7×16.5") requires at least 3500×4950 pixels at 300 DPI. A screenshot is roughly 1080×1920 pixels — about 6× too small. Printing it at A3 size produces a blurry, pixelated result.
The compression problem
Spotify compresses album artwork for streaming — it's optimized for fast loading, not quality. Even before you screenshot it, the image has already been compressed from its original.
The ratio problem
Album covers are square (1:1). Most poster formats are portrait (2:3, 4:5, or similar). A square screenshot doesn't fill a portrait poster canvas without either significant cropping or adding substantial empty space.
The UI problem
Spotify's interface — the controls, the song title overlay, the bottom navigation bar — is almost always present in a screenshot. Cropping it out loses more of the already-limited resolution.
The Right Way: Use PosterVibe
PosterVibe pulls album artwork directly from Spotify's high-resolution asset library — the same source the streaming service uses internally, not the compressed thumbnails you see on screen.
The difference:
- PosterVibe source: 640×640px or higher native resolution album art (3× the compressed stream version)
- Screenshot source: Compressed JPEG at device screen resolution
More importantly, PosterVibe wraps that album art in a proper poster layout — the right dimensions, with artist name, tracklist, label, and date — producing a file that's genuinely ready to print.
Step-by-Step: From Spotify Album to Poster
Step 1: Find the Album You Want
You don't need to screenshot anything. Open postervibe.app and search the album name in the search box on the left panel.
The search pulls from Spotify's public catalog — every album, EP, and single available on Spotify is findable here. Type the album name, artist name, or both.
Step 2: Select the Album
Click the album in the search results. PosterVibe automatically imports:
- High-resolution album cover art
- Artist name
- Album title
- Full tracklist in correct order
- Release year and record label
This takes about 3 seconds. No uploading, no cropping, no quality loss.
Step 3: Choose a Template
The left panel's Template tab shows available design templates. Click any to preview it with your album's art. Templates range from minimal white backgrounds to dark atmospheric styles.
For turning a Spotify album into a poster, consider:
- Minimal Style — lets the album art do the work; clean, gallery-like
- Dark Style — works especially well for albums with dark or moody cover art
- Modern Style — high contrast, strong visual impact for contemporary albums
Switch templates freely — your album data persists when you change.
Step 4: Adjust the Layout
The right panel lets you customize every element:
- Artist name and album title: font, size, color, position
- Tracklist: visible or hidden, font, column layout
- Background color
- Image position and scale within the canvas
For most albums, the default layout works well. The most common adjustment is to increase the artist name size or change the font to better match the album's aesthetic.
Step 5: Choose Your Output Size
In the Size tab of the left panel, select the output format:
| Size | Best for |
|---|---|
| A4 (21×29.7cm) | Desk or shelf display, testing a design |
| A3 (29.7×42cm) | Standard wall poster |
| A2 (42×59.4cm) | Feature wall or statement piece |
| 18×24" | US standard wall poster |
| 4:5 | Instagram post (digital only) |
| 1:1 | Square (Instagram grid or album cover display) |
For wall display, A3 or A2 is the standard. For an Instagram post, 4:5.
Step 6: Export
Click Export in the top toolbar:
- For home printing: JPEG or PDF, 150 DPI
- For a print shop: PDF, 300 DPI, CMYK
- For Instagram: JPEG, 72 DPI, 1080×1350px
The download begins immediately. The file is named after your album for easy identification.
If You Want to Start from Your Own Screenshot (Not Recommended, But Possible)
If there's a specific Spotify moment — a screenshot of Spotify Wrapped, a personalized playlist, a "liked songs" screenshot — that you want to turn into a poster, PosterVibe's image upload feature lets you work with a custom image.
Upload it as a base image:
- In PosterVibe, use the image upload button in the left panel
- Select your screenshot file
- The image is added to the canvas as an element you can resize and reposition
- Design around it — add a background color, overlay text, add framing elements
The limitations remain: a screenshot is still a screenshot. At poster sizes, it will look soft. The best use of this feature is for small-format prints (A4 or smaller) or digital-only output where the resolution limitation doesn't matter.
The better approach for Spotify Wrapped content: Build a Wrapped-inspired poster using PosterVibe's tools rather than screenshotting the Spotify UI. Add the album art of your top album, your most-played artist name, and the year in large type. The result is higher quality and more intentionally designed.
Spotify Wrapped Specifically: A Common Request
Many people want to turn their Spotify Wrapped results into a poster. The right approach:
- Note your top albums/artists from Wrapped (the actual data)
- In PosterVibe, search your #1 album from that year
- Choose a layout that works for a "year in music" aesthetic
- Add free text for any Wrapped stats you want to include: "My most played: 847 plays" or "2024 in music"
This produces a poster that references your Wrapped data without the resolution and format limitations of a screenshot.
FAQ
Can I use a screenshot as the background of a poster?
Yes, using PosterVibe's image upload. Set it as a background image and design over it. For A4 or smaller output, the resolution may be acceptable. For A3+, it will soften.
What if the album isn't on Spotify?
PosterVibe searches Spotify's catalog. For albums not on Spotify — regional releases, limited pressings, pre-streaming era albums not digitized — you can upload your own image via the image upload feature. For best results, use the highest-resolution image you can find (album cover images on Wikipedia, MusicBrainz, or the label's official site are often available in high quality).
Does PosterVibe require a Spotify account?
No. The album search uses Spotify's public API, which doesn't require you to have or log into a Spotify account. Just search by name.
What's the resolution of album art PosterVibe uses?
PosterVibe retrieves artwork at up to 640×640px from Spotify's public API — significantly higher than streaming-compressed thumbnails. For most print sizes up to A3, this is sufficient. For A2 and above, results vary by album (some have higher-resolution source art, some don't).
Can I download just the high-res album art without the poster layout?
PosterVibe is a poster design tool — the output is always a full poster layout. If you just want the artwork file, it's not the right tool. For that use case, try the MusicBrainz Cover Art Archive or the album's official sources.